Installation check
First, we will check the exact location of the current configuration file for HTTP websites. For that, run the following command:
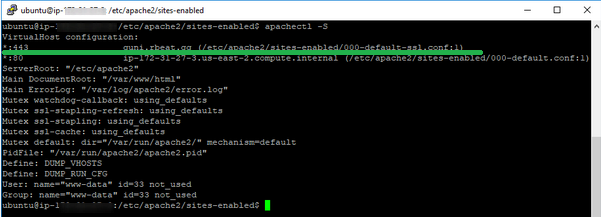
sudo apachectl -S
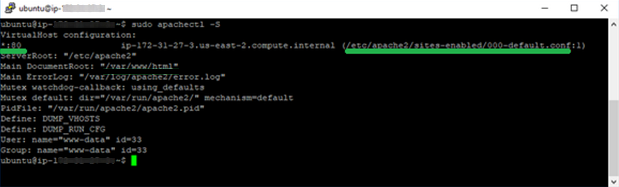
- We can see the website configuration file (the one for non-secured HTTP connections via port 80) in the output. It is usually called "
000-default.conf".
The default folder for such a file location is/etc/apache2/sites-enabled.
We will show in detail how to add the settings for HTTPS port 443 into the same configuration file. However, a separate configuration file for port 443 can be created in the same folder as well (for other ways to manage HTTPS settings see the ‘Tips and troubleshootings’ part of this guide). - Enabling SSL/TLS support on Apache
Before we proceed any further, we will need to make sure that SSL/TLS support is enabled on the webserver. For that, we will need to run the following command:
sudo a2enmod ssl
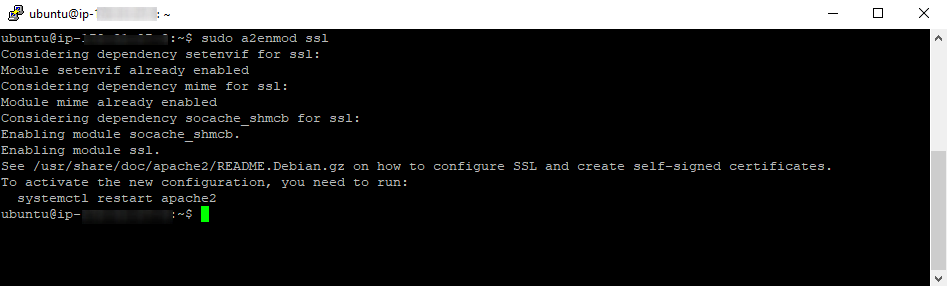
If the command responds with “Module ssl already enabled”, then the module has already been enabled
If the module was not yet enabled, the command will respond with ‘Enabling module ssl’ and will complete the module enabling.
After that, reboot the webserver so that the module can be applied to Apache. The service can be restarted by entering the following command:
sudo service apache2 restart
Configuring the webserver
Now, configure the website to work with the SSL certificate.
- If there were no SSLs installed on the webserver previously, check the configuration file name for the HTTP port 80 and open it in your text editor of choice (nano, vi, etc.).
The configuration file name can be checked using the command: apachectl -S
It is usually located in the /etc/apache2/sites-enabled folder.

Then open the configuration file and paste the following code at the very bottom of it:<VirtualHost *:443>
ServerName (DOMAIN NAME OF THE WEBSITE)
DocumentRoot (ROOT FOLDER OF THE WEBSITE)
SSLEngine on
SSLCertificateFile (Certificate PATH)
SSLCertificateKeyFile (Private key PATH)
SSLCertificateChainFile (CA Bundle PATH)
</VirtualHost>
Make sure to replace the command values in brackets with the valid information for your domain name or website.
In our case, it is as follows:
<VirtualHost *:443>
ServerName example.com
DocumentRoot /var/www/html


SSLEngine on
SSLCertificateFile /etc/ssl/1.crt
SSLCertificateKeyFile /etc/ssl/1.key
SSLCertificateChainFile /etc/ssl/1.ca-bundle
</VirtualHost>
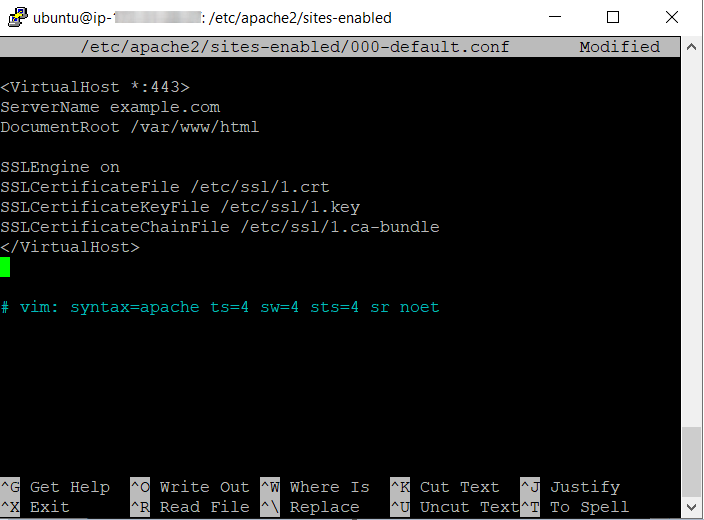
After that, save the file.
- If the SSL certificate was already installed on the webserver, check the configuration file name for port 443 and open it in the text editor.
The configuration file name can be checked using the command: apachectl -S

- Then, make sure to replace the paths of the certificate files in the following sections:
SSLCertificateFile
SSLCertificateKeyFile
SSLCertificateChainFile
Enter the full paths to the SSL certificate, Private key and CA bundle files respectively uploaded or located on the server. After that, make sure to save the configuration file. - Checking the configuration file and restarting the webserver
Now, make sure to check the file syntax by running this command:
apachectl -t
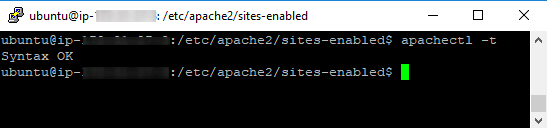
If the command responds with “Syntax OK”, you can reboot the webserver. To do that, run the command:
sudo service apache2 restart
The configuration file should be listed in the Apache configuration files list (it can be checked by running apachectl -Sonce again):
- Done! The website is now secured. The installation can be checked here.
There are no further obligatory actions for securing your domain name, however, you might wish to set up a HTTPS redirect for the website to be switched to a secured version automatically without entering https:// manually into the browser address bar. For a more detailed explanation about setting up the redirect, check this page.
If there are issues with the installation, make sure to double-check this guide step-by-step to avoid mistakes. You can also check the next part of this guide as well.
